P2P-Networking
Peer-to-Peer File Sharing Application
CPS 706 - Computer Networks Course Project
This application is a peer-to-peer service to transfer files between users.
Getting Started
In order for the application to work, you have to first initialize a few DHT (Distributed Hash Table) servers that will store the IP addresses for each of the files in the network. Each of the clients need to initialize them serves using the code provided in the network that will allow them to get the IP of the desired files, and download/upload files as desired by the network.
Here are the instructions needed to begin the application:
Prerequisites
First of all, please download all the files to your local machine.
The path to the executable for the DHT server is located at
~/Source Code/DHT Server/src/code files/
The path to the executable for the client is located at
~/Source Code/Client Server/src/app/
No special installation or set-up is necessary. Be prepaid to use your command line to run JAVA applications (JAVA compiler is required for such task).
Initializing DHT Servers
To start the peer-to-peer network you first have to initialize 1 or more DHT servers on the network that will store the IP addresses of the clients.
In order to do so you will need to locate the DHT source files in the directories as seen above and run the following lines on the command line of your machine. Please make sure that your command line is pointed to the DHT Server directory.
>> javac DHTServer.java
>> java DHTServer
Executing the above 2 lines will compile the java application and run it. The first line that appears will be the IP address of your local machine. The second line will ask you to enter the ID number for the give DHT server. The numbering for the servers begins with 1. Once the ID is entered, the application will ask you to enter the IP address of the IP address of the successor DHT server. In the case of multiple DHT servers, please make sure you assign the ID’s in sequence and specify the correct IP for the next DHT server. If you are running only one DHT server then enter your personal IP address in the successor IP field.
Once all of the above information is entered, the output should look like this
>> 192.168.2.12
>> Enter ID: 1
>> Enter successor server IP: 192.168.2.12
UDP server has been successfully initialized!
TCP server has been successfully initialized!

All systems working properly!
Next step is for each of the client(s) (user(s) for the P2P network) to initialize them selves in the network.
Initializing Each User
There can be any amount of users in the network. To begin using this application, each user has to initialize themselves on the network. This is done by running a JAVA program on each clients local machine.
Each client needs to follow the below steps to start exchanging files
First, run the “Client Server.jar” file either by double-clicking the file or by running the following command in powershell:
>> java -jar "Client Server.jar"
When first started, you will be presented with the following window:
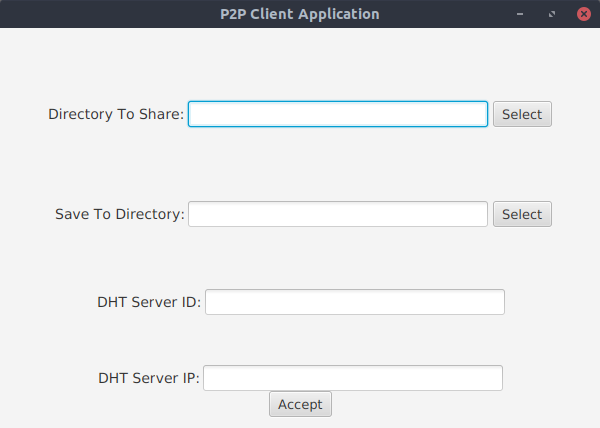
Here you will select the directory of both the folder of photos you wish to share, and the folder to save downloaded photos to. You will also enter the ID and the IP of the initial known DHT Server.
After filling out the information and pressing accept, the client and server of the P2P member will be started and you will be presented with the following window:

Here, you can open the directories that you have chosen and put in the name of the file(including extension) you wish to download. If downloaded successfully, you will get a “File Successfully Downloaded” message or an error message if there were any problems.
Authors
- Mark Volfson
- Michael Teitelbaum
- Elena Zubko